Securing Your Home Assistant With LetsEncrypt SSL

In our previous Home Automation tutorials - our Home Assistant traffic traverses through the Internet un-encrypted.
This means anybody can intercept the data and peek into the contents. Because everything is in the clear, the API password that's embedded in the URL is also exposed to the public.
I'm perfectly fine with that, most people will consider this a security risk.
Securing web sites used to cost a lot of money - domain names and SSL certificates can cost a lot of money. Times have changed. Thanks to LetsEncrypt and DuckDNS, SSL protected websites are no longer for the rich.
There are two main reasons to encrypt your HomeAssistant assistant:
- All communications back to your Home Assistant to and from the Internet will be encrypted.
- With SSL - you can now link your Home Assistant setup to Google Home (Home Control). This opens up some of the home controllable devices to the greather Google system - and is a lot flexible than IFTTT.
Sure devices like YeeLights can already be connected directly to Google Home. However, personally I reckon it is far better in the long run to centralise everything in Home Assistant, then expose the things you want into Google.
Even if you are not fussed with security, #2 alone justifies the effort to secure your Home Assistant. In this tutorial we will show you how to create your very own domain and to how to use LetsEncrypt certificates to secure your Home Assistant server.
Linking Home Assistant setup to Google Assistant will have to discussed in another time.
Creating Your Domain Using DuckDNS
You can skip this step if you have already configured your dynamic domain. There are several dynamic DNS services, e.g. No-IP or DynDNS.
DuckDNS is a fairly new entrant and offers the least hassle free configuration so far. We will describe how you can create your own unique hostname using the very straightforward DuckDNS service.
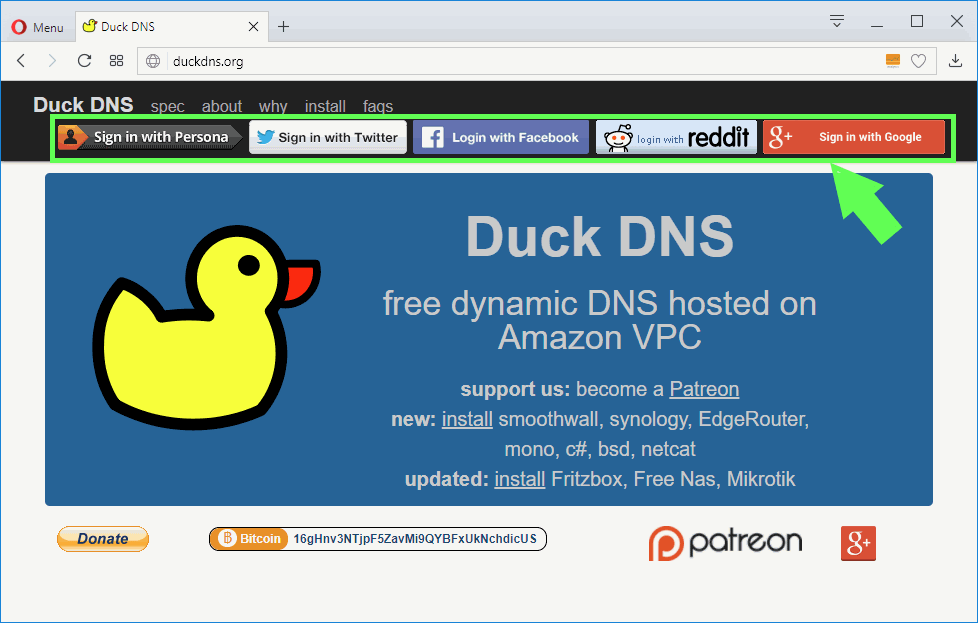
- Click on one of the login buttons to login:
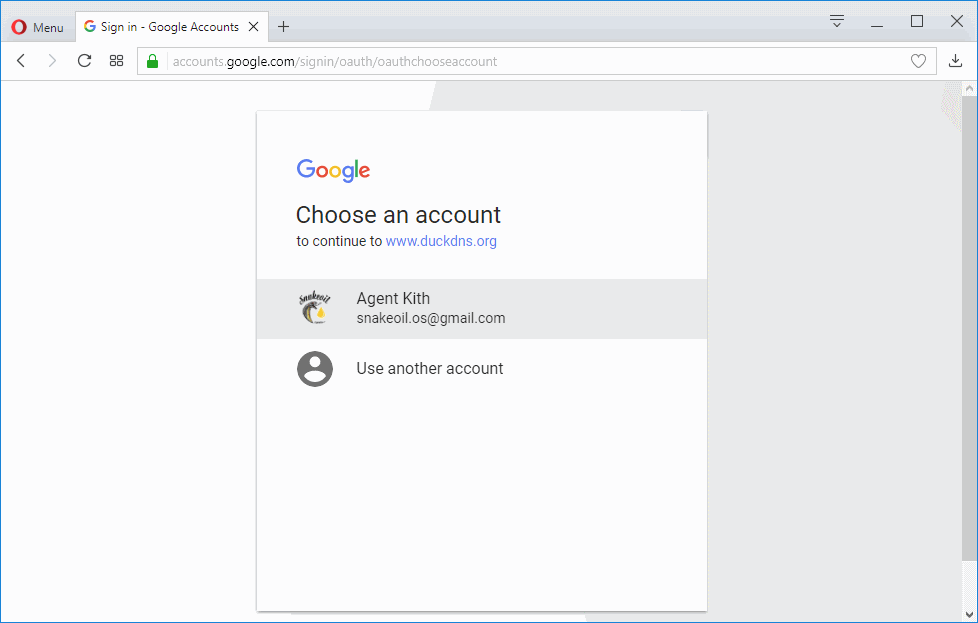
- If this is a new account, you'd be prompted to choose an account. I'm using Google+ in my examples (other services will differ slightly but the process will be similar):
- You'd see this rather straight forward interface once you're logged in:
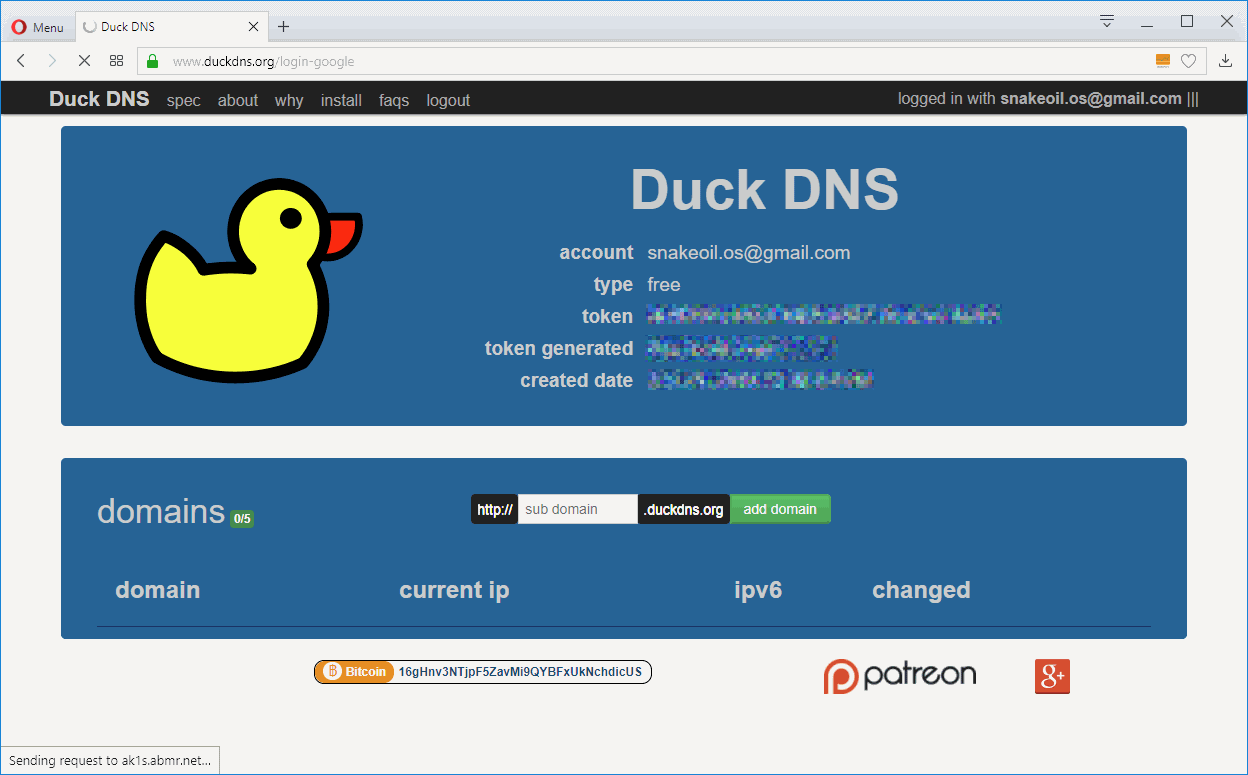
- DuckDNS allows you to define 5 hosts. Think of an easy to remember name, and enter it in the 'sub domain' text field.
- Click the green 'Add Domain' button.
- If the domain name is used an error will pop up. If the domain name is free, it'd be added to your list below, and you have 1 less out of 5 domains left to use.
Pretty straight forward! Love their work. If you do as well please consider donating to their project also.
Make Sure Your Domain Is Always Using Your Latest External IP Address
For most people, your external IP address is not permanent. Home Assistant has a duckdns component that will update your domain should your IP change. To use this component, edit your configuration.yaml file and add the following (remember to use your unique token ID).
duckdns:
  domain: smart-ultrahouse
  access_token: [Your DuckDNS token here]
Restart HomeAssistant and away you go.
Getting LetsEncrypt Certificate
Now it's time to get your SSL certificates. Here's how I did mine, feel free to adapt and find the solution that works best
- Forward port 80 to your Home Assistant internal IP. If you're unfamiliar with how to do this, go to this website and follow the guide for your router: https://portforward.com/
- Make sure you don't already have anything running on port 80 and 443. If there are, stop them for now.
-
SSH into your Home Assistant setup, and run the following commands:
$ sudo apt-get update
$ sudo apt-get install software-properties-common -y
$ sudo add-apt-repository ppa:certbot/certbot
$ sudo apt-get update
$ sudo apt-get install certbot -y
-
Once certbot is installed, run the following command (replace your_domain.duckdns.org with your own domain):
certbot certonly --standalone -d your_domain.duckdns.org
-
Follow the prompts of certbot. If everything works, you should see the following:
IMPORTANT NOTES:
 - Congratulations! Your certificate and chain have been saved at:
   /etc/letsencrypt/live/your_domain.duckdns.org/fullchain.pem
   Your key file has been saved at:
   /etc/letsencrypt/live/your_domain.duckdns.org/privkey.pem
   Your cert will expire on 2018-05-11. To obtain a new or tweaked
   version of this certificate in the future, simply run certbot
   again. To non-interactively renew *all* of your certificates, run
   "certbot renew"
 - If you like Certbot, please consider supporting our work by:
   Donating to ISRG / Let's Encrypt:   https://letsencrypt.org/donate
Donating to EFF: https://eff.org/donate-le - You can now remove the port 80 forward you created in step 1.
Go to the next page for Home Assistant configuration.
Renew Your Certificate Periodically
LetsEncrypt Certificates are valid for 3 months only. To setup a schedule to renew the certificates, follow these steps.
- SSH to your Home Assistant computer
-
Change into your root account by running this command (enter your password if prompted):
sudo su
-
Run this command to edit your cron jobs:
crontab -e
-
You will see the following message if you're editing the file for the first time. Select nano as it's the easiest to use (i.e. enter :
no crontab for root - using an empty one

Select an editor.  To change later, run 'select-editor'.
  1. /bin/ed
  2. /bin/nano        <---- easiest
  3. /usr/bin/mcedit
  4. /usr/bin/vim.basic
5. /usr/bin/vim.tiny -
Add this line:
15 03 1 */6 * certbot renew
- The above line sets up a cronjob to run a job on the first they of every alternative month at 3:15 am.
- Save the file and exit. If you're using nano, use CTRL-X to save and quit.
Prepare Your Home Assistant For SSL
Edit your configuration.yaml and add ssl_certificate and ssl_key under http:. Replace the text your_domain with your unique domain name.Save the configuration, and restart Home Assistant.
http:
  # Secrets are defined in the file secrets.yaml
  api_password: !secret http_password
  # Uncomment this if you are using SSL/TLS, running in Docker container, etc.
  ssl_certificate: /etc/letsencrypt/live/your_domain.duckdns.org/fullchain.pem
  ssl_key: /etc/letsencrypt/live/your_domain.duckdns.org/privkey.pem
Test Your Setup
It's now time to test your setup. Fire up your browser - and enter your domain in the address bar now. Because your are using SSL now, make sure your URL begins with https://. As an example:
https://your_domain.duckdns.org:8123/
Check for the lock symbol before your domain, it should have a symbol of a lock, with no lines or cross over the lock.
![]()
Different browsers have different notations to represent encryption. Most browsers will display a padlock, and it's usually green in colour. Your website is now protected if you see something similar to the above.
And that's it. Now that your Home Assistant is protected by SSL, this means:
- Your API password is encrypted, safe from prying eyes
- You can connect your Home Assistant environment to Google Assistant. We'd talk more about this in a future article.
Related News
Linking Google Assistant To Home Assistant 0.80 and above
Every new Home Assistant release brings breaking changes.
Link Your Home Assistant To Google Assistant Home Control
Article removed as content is meant for older version of HASS and will no longer work in 0.8 and

Add new comment