Different Network Topologies For Music

In an earlier article, we talked about how Jumbo Frames can improve music playback, and how the emotion connection is lost without it. If you havn't read that article yet, hit it up and read that article first before this.
Up to speed (No puns intended)? If so, let us continue on!
This article will expand on the first article and discuss network strategies - in other ways, describe various connection methods. This is part #2 of of the networking series.
There are multiple ways to wire up your home network. In this article we are going to focus on some of the more common strategies.
Layer 2 (L2) Single Network
In this model, you only have one network. Every device can communicate directly with one another. The local traffic destined to stay within the switch(s) form your single Local Area Network (LAN for short). LAN traffic stays within the switch (or switches if you have more than one).
Everything else is deemed external traffic e.g. Internet traffic, often referred to as Wide Area Network (WAN). This external traffic is directed to the router. In this model, the router will have two IP address - a LAN IP address, and a WAN IP address (From your ISP). The LAN IP address of the router is called the gateway IP address, every device on your LAN knows about this gateway address (as this is their "way-out" to the Internet).
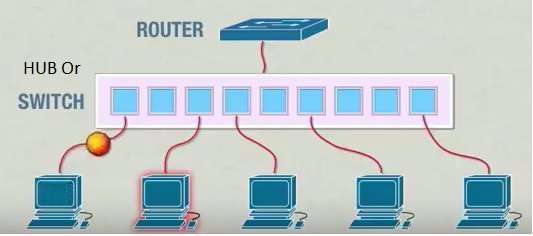
The router thus serves the role of a gate keeper between your LAN and WAN. Note that the above illustration is just a "logical" breakdown of the features:
- router (Manage traffic across different subnets)
- switch (connect devices on the same subnet), and
- clients (devices like computers, streamers, tablets, etc.).
"All-in-one" devices that combines the features of a router and switch are pretty common, and almost every household will have some sort of unit that does routing, switching and WIFI access.

All your devices simply has to connect to this single unit and everything just works. If you need more wired ports, connect a second switch to this all-in-one and everything will function seamlessly.
This is the most common home setup.
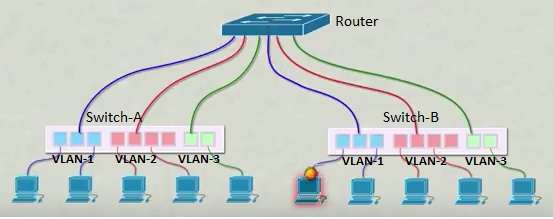
Layer 3 (L3) Multi Network
In more complicated setups. You have multiple LANs instead of just 1.
Say for example if have 3 LANs (LAN1, LAN2 and LAN3), LAN1 can only see devices that's connected to LAN1. Devices on LAN1 cannot directly communicate with devices on LAN2 and LAN3 (The same rules applies to LAN2 and LAN3). The router continue to act as the gate keeper directing traffic between the 3 LANs, plus external WAN traffic (Internet). Cut the router and you instantly isolation each LAN to itself.
If a switch only works with 1 LAN, trying to setup multiple LANs across multiple areas/rooms will create significant problems. The amount of wires and switches will grow exponentially, creating big management and administration problems.
Modern switches allow you to create something called a VLAN (Virtual LAN). This feature allows you to create a "sub-switch" within a switch. So you only use a single VLAN capable switch instead of getting three dumb switches to setup your network. And you only need a single switch per area/room.
A VLAN capable switch provides better flexibility, keep the costs down (on hardware costs and wiring), and more importantly makes your life simpler.
In the above example, a router will have a total of 4 IP addresses, 3 LAN address plus a WAN address out to the Internet. Devices can only communicate directly with other devices on the same coloured ports (i.e. blue can talk to blue, red to red and green to green). Inter VLAN communicates needs to cross between the LAN IP addresses of the router. Like the example from the previous page, the router steps in direct traffic between the 3 LAN and the WAN.
Commonly referred to as a layer 3 network (Ability to route data internally and externally), this setup is more common in businesses. While we see a router in this illustration, again like All-In-one home routers, you can also purchase L3 switches that can combine the features of L2 switching and L3 routing (Commonly referred to as Inter-VLAN routing).
Obviously this is a very brief introduction and things are over-simplified. For example I did not elaborate the reasons for running multiple LANs in the local environment, or explain what access/trunk links are, or talk about tagged vs untagged, etc..
In simple terms, L3 introduces routing, and L2 is just simple switching.
Hybrid
There is also the Hybrid models. Multiple LANs, but only some LANs can connect to the Internet (aka has a link to the router). LAN without a IP address on the gateway can only communicates within it's own network, and nothing else. This model will be described in L2 Strategy #1 later.
Planning Ahead - Equipment You Need
It pays to put some forward thinking into deciding what you want to achieve in the short, medium and long term. For jumbo frames to be effective, everything running on your network needs to have this feature enabled.
Here are the minimum requirements.
Networking Switch
Do not scrimp on this. Not all switches are built the same. You need a switch that can forward packets at wire speed (as close to 1000 Mbps as possible). Look for a switch with the following features:
- VLAN or 802.1Q
- Jumbo Frames
- Port Aggregation/Trunking/LACP/802.3ad
- IGMP v2/v3 support (Optional)
- Layer 3/Inter VLAN routing (Optional)
- Quality of Service QoS (Optional)
These switches typically have a web or command line interface.
Currently I am mixing Unifi with Meraki (Both are L2 only). Do not get the Unfi series of switches. These switches lack some important features. The Edge Series might be the better option, but I have yet to test/verify.
You cannot go wrong with a Cisco switch. Look for one with L3 support, plus the features list above. Go for fan less where possible. Second hand models can be purchased for next to nothing on e-bay. An example will be the SG gigabit series.
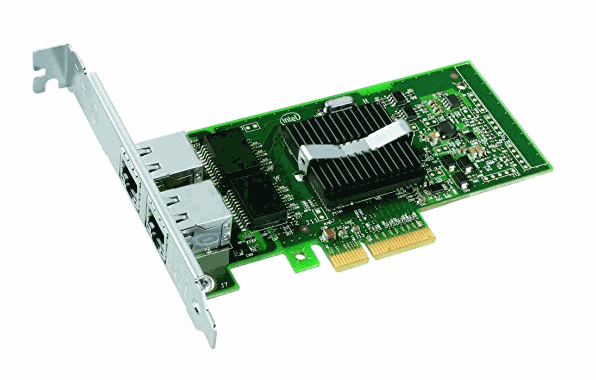
Dual Port Intel NIC for your Snakeoil PC
Use an Intel network card where possible. Accept nothing less. Take this advice or you will learn your lessons the hard way. If you want Jumbo frames, go with Intel.
For added flexibility, make sure your PC has two Ethernet ports. You can use the motherboard's Ethernet port. But if it's not Intel chipset, disable the on board NIC and get a dual or quad port network card. These are pretty cheap off eBay.
Dual port NAS
Like your media player, ideally your NAS should have dual network ports - again Intel chipset preferred. Although it is not strictly necessary as most NAS these days offers VLAN tagging, having two ports just gives you the extra flexibility.
The above are the absolute minimum requirements. I cannot guarantee that this tweak will work if your current setup does not meet these requirements. As a matter of fact, I cannot even guarantee that you will get an improvement if your equipment meets or exceeds these. All you can do is try these topologies out and see if the change is beneficial to you, or not.
As usual, with everything on the Internet, YMMV (Your mileage may vary). What works for me does not necessarily mean it'll work for you (and vice versa). At the end of the day, you the audiophile has to discover what sounds best to you.
What Are The Goals?
Our end game is simple - make sure the network between NAS ⇄ Media Streamer is isolated as much as possible, and maximise throughput.
Traffic Isolation
Minimise spurious network traffic the best you can. Some strategies:
- Reduce the number of devices on this network to a bare minimum. Just the NAS, your streamer PC(s) and nothing else
- Reduce broadcast/multicast packets. Disable DHCP services, enable IGMP snooping on the switch.
Do everything you can such that this network only contains mostly just one type of traffic (music) and little of everything else. Connect your NAS and music streamer to the best (fastest) switch you have. It pays to design your music network as such, because you can forget about QoS. In simple terms, QoS is about prioritising one type of traffic over another (e.g. you want your FPS games' traffic to have a higher priority over everything else). Since there is only one type of traffic, there is nothing else to prioritise!
And because the two critical devices sit on the same switch, you are assured of wire speed (assuming you're using a quality switch).
Throughput
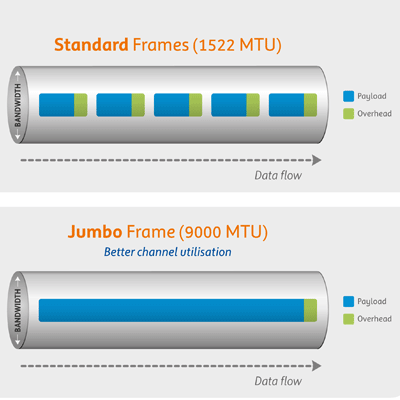
What is throughput? In the context of this article, the amount of data you can push over the wire per second. The bigger the number, the higher the throughput. It does not matter if you are using 10 Mbps, 100 Mbps, 1 Gbps, 20 Gbps, 40 Gbps or even higher baud network. Given the network wire speed, you just need to make sure all the bandwidth is at your disposal. In a nutshell, this means improve the efficiency of data transfer, i.e. enable Jumbo Frames.
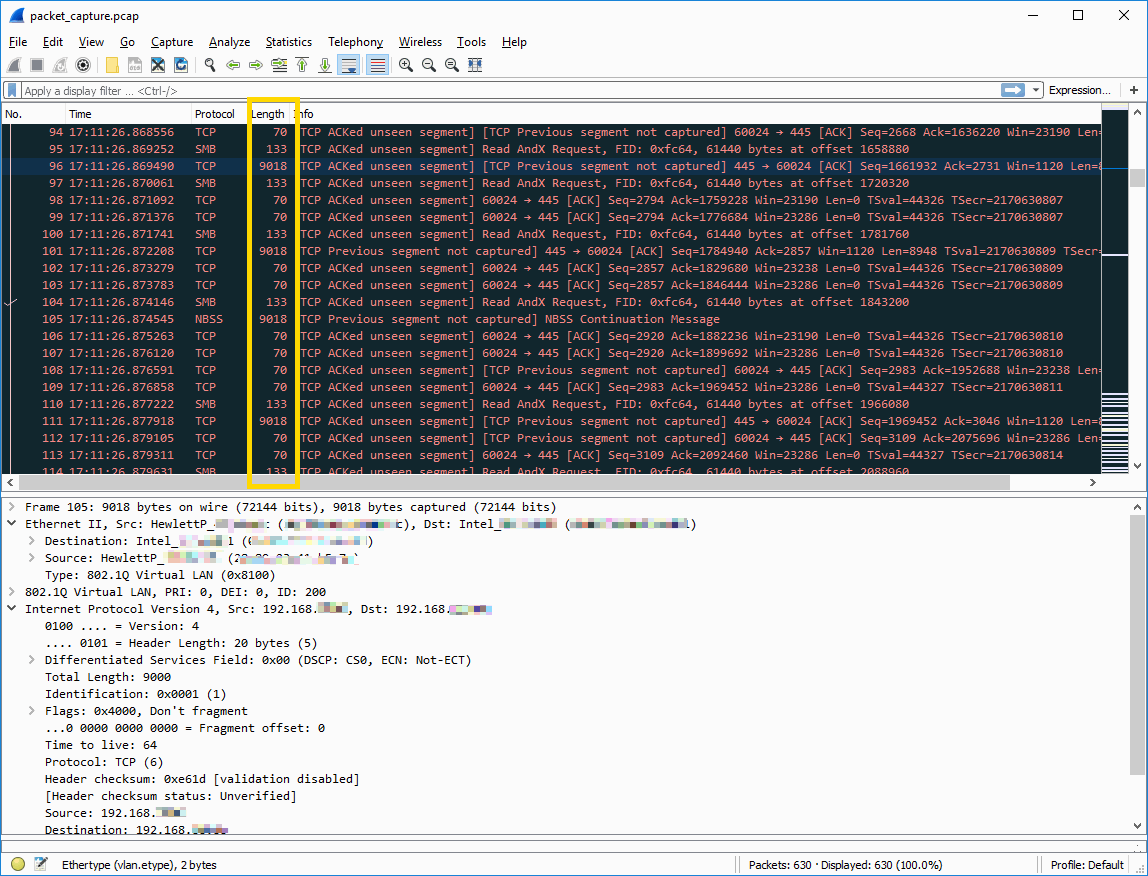
Adjusting the MTU (message length) to 9000 bytes does not imply every packet always will have a message length of 9000 bytes. This is just the "upper-bound" number. Specifying the maximum length a network packet can be. The payload can be anything from a few bytes, to this maximum value of 9000 bytes. On gigabit network, MTU size of 9000 bytes is about 99% efficient.
Here is an example of the traffic on my music network. Note the lengths have various lengths, from 70 bytes all the way to 9018 (music contents).
With the current music formats available at time of writing, you are not going to be close to saturate the 1000 Gbps bandwidth. These two goals only make sure that when there the time come where data needs to be sent from your NAS to the media streamer, all your lanes are free, wide open and super ready for the exchange to take place.
What Are The Pitfalls?
Mixing jumbo frame enabled devices with non jumbo frame enabled devices is a recipe for certain disaster. Things will appear to work, until they don't!
Most Android boxes and things like Raspberry Pi do not support Jumbo frames. Some android boxes will refuse to work (or freeze intermittently) if they are on Jumbo frames.
Careful consideration has to be made to make sure everything works as designed. Placing your NAS and music streamer on the same switch not only provides the best efficiency, it is also going to reduce headaches!

As with everything, start start simple and expand from there. The first step is to create a simple network between your NAS and Music Streamer. If you do not perceive any audio benefits after a few days, then there is very little point to proceed to the next steps. Quit while you're ahead.
L2 Strategy #1: Direct Connection Between NAS & Media Player
This is the easiest configuration, and the reason why you want dual port NICs for your NAS and Media Streamer.
Your Media Player and the NAS sits on it's own network (192.168.2.0/24) with Jumbo frames running. Everything else sits on your home network (192.168.1.0/24) and using the stock standard MTU of 1500.
Your NAS shares your files to your Windows PC using a MTU of 1500, but uses a MTU of 9000 when sharing the same files to your Media Player. Achieving both goals of traffic isolation and throughput.
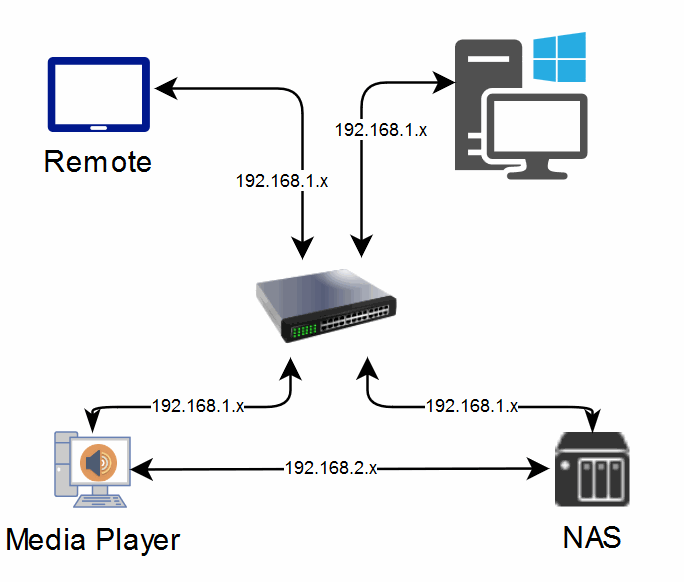
Devices sitting one network cannot see the other. The only machines that can communicate to both networks are the ones with dual NICs (i.e. the NAS and the media streamer).
Pros
If you only have 1 media player, this is super simple to setup. This also gives you a good background into networking. If you cannot even get this up and running, it is unlikely you will succeed in more complicated network topologies.
Cons
A switch can act as a noise isolator. A direct connection between the NAS and your music streamer may introduce any low level electrical noise from the NAS into your streamer.
While simple in design. This solution is unpractical logistically and do not scale well. What happens if your NAS, switch, and media player is located in difference areas? .
Things get complicated really quickly! The last thing you want is to create a network loop!

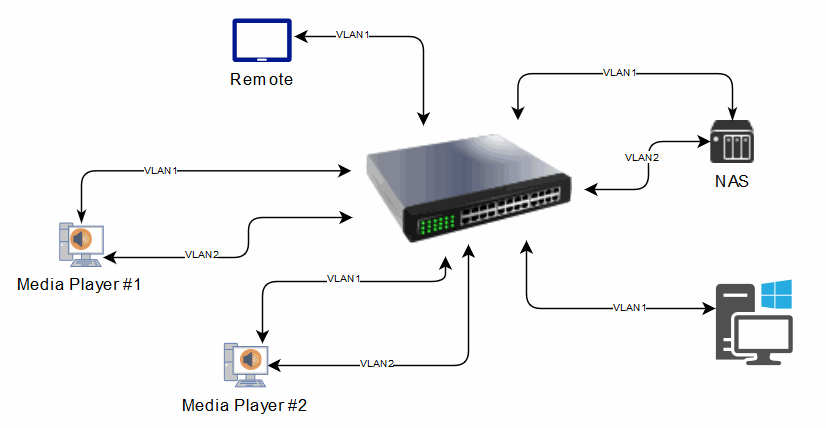
L2 Strategy #2: NAS & Media Player on it's VLAN
VLAN allows you to create a virtual switch within a switch! So assuming you are working with a 24 port switch. You can configure ports 1 - 10 ports to be on VLAN1 (192.168.1.0/24), and ports 11-20 ports to be on VLAN2 (192.168.2.0/24).
So it's like you have partitioned your switch into two, and now your network looks simpler!
Pros
You can combine your dual NICs machines and potentially reduce the latency, and/or double the bandwidth (Not supported with Ubiquiti Unfi).
Isolate any noise between the NAS and the music streamer.
Cons
This can be daunting if you have never configure a switch before.
Like #1, devices on VLAN1 cannot communicate with VLAN2 (a router does not exist in this diagram).
Start with L2 Strategy #1 or #2, listen to music for a couple weeks, and see if you hear any benefits. If you do not perceive any benefits, stay with what you have and forget about network tweaks for now.
If you perceive a difference, you may want to move on to L3. Why L3?
L3 Strategy #1:
Layer 3 adds the ability to route traffic from one subnet to another. No longer are you cut off from one another. This routing module allows devices on VLAN1 to communicate with VLAN2 (and vice versa). This means your Windows PC (VLAN1) can now access your music on the NAS (VLAN2).
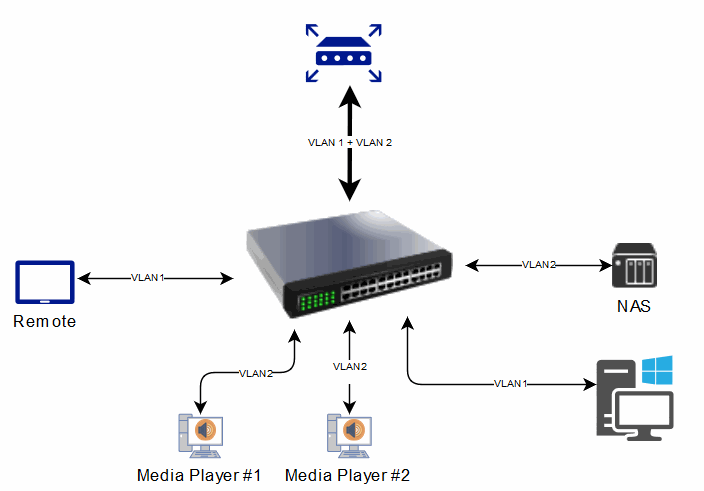
This is similar to having a big L2 network where all devices can talk to each other, with a big difference. Device only talk to others if there is a need to. Unnecessary traffic like broadcast, and query packets no longer flood the network. So you still maintain a good degree of network isolation, and throughput is not affected.
The routing module does not really have to super fast. This is because traffic between NAS ⇄ media player is already working at wire speed (same VLAN) when it's connected to the same switch (the traffic stays within the switch and never made it's way to the router!). With L3 setup, you can now use your tablet (on VLAN1) to directly remote control your media player (on VLAN2). This still keep unnecessary network traffic to a bare minimum.
Pros
You can combine your dual NICs machines and effectively double the bandwidth (Not supported with Ubiquiti Unfi) or reduce latency.
Cons
This is going to be even harder to setup.
Routing Jumbo frames can be problematic.
In Conclusion
And there you have it. Initially my intention was just to write out a HOW-TO article on how to setup jumbo frames, VLAN and routing. But I feel a second follow up article is necessary to explain the motivations. We do not want you guys to blindly follow the steps and then have no idea if it's beneficial or not.
The goal of Snakeoil is always this - music, your way.
We, the Snakeoil Squad, only serves as the facilitator. You as the audiophile have the complete freedom to investigate, and discover what sounds best to yourself. You get to call the shots, as such it is important to know the things you have just read. There is no universal solution. What works for me may not work for you. At the end of the day, the choice is yours to make.
If you are interested to explore this tweak, be sure to stay tuned for the next one in this series, where we'll hopefully discuss the following:
- Enable Jumbo frames on switches
- Enable jumbo frames on PCs and other devices
- Setup VLANs
- Subnets and netmasks
- Setup access ports and trunks to router
- Inter-VLAN routing
A word of warning, this is not for the faint hearted! :)
Comments
Really nice introduction,…
Really nice introduction, thanks for sharing and i will follow the next steps for sure. It can be impossible to explain a setup in detail with variety of routers and switchs on the market, but give an example with the main guidelines will be an huge help for that! Happy new year Kith!
Jumbo frames on RPi. Try…
Jumbo frames on RPi.
Try this:
https://www.raspberrypi.org/forums/viewtopic.php?f=29&t=244471&p=166569…
Very nice find!!!!! Thanks.
In reply to Jumbo frames on RPi. Try… by Dave (not verified)
Very nice find!!!!! Thanks.
Add new comment