Install Home Assistant On A Raspberry Pi


I'm running my Home Assistant in my home lab. This is overkill for most people - a cheap US $35 Raspberry Pi has enough processing power to automate your house.
This tutorial is a quick HOWTO on the basics of a Raspberry Pi, and how to install Home Assistant on one.
Although this HOWTO is written for Raspberry Pi 2, it should work for the 3 too.
What Is Raspberry Pi
Raspberry Pi are devices designed by the Raspberry Pi Foundation. From the horses mouth (Link):
The Raspberry Pi Foundation is a UK-based charity that works to put the power of digital making into the hands of people all over the world, so they are capable of understanding and shaping our increasingly digital world, able to solve the problems that matter to them, and equipped for the jobs of the future.
We provide low-cost, high-performance computers that people use to learn, solve problems and have fun. We provide outreach and education to help more people access computing and digital making. We develop free resources to help people learn about computing and how to make things with computers, and train educators who can guide other people to learn.
In other words, it's a credit card sized, low power computer and is the perfect platform to run Home Assistant.
By the way, the Pis are also the perfect platform for Snakeoil OS. Perhaps not as the primary rig, but it'd do nicely as secondary listening zones at your shed or office.
No ETA as yet but it's in the works.
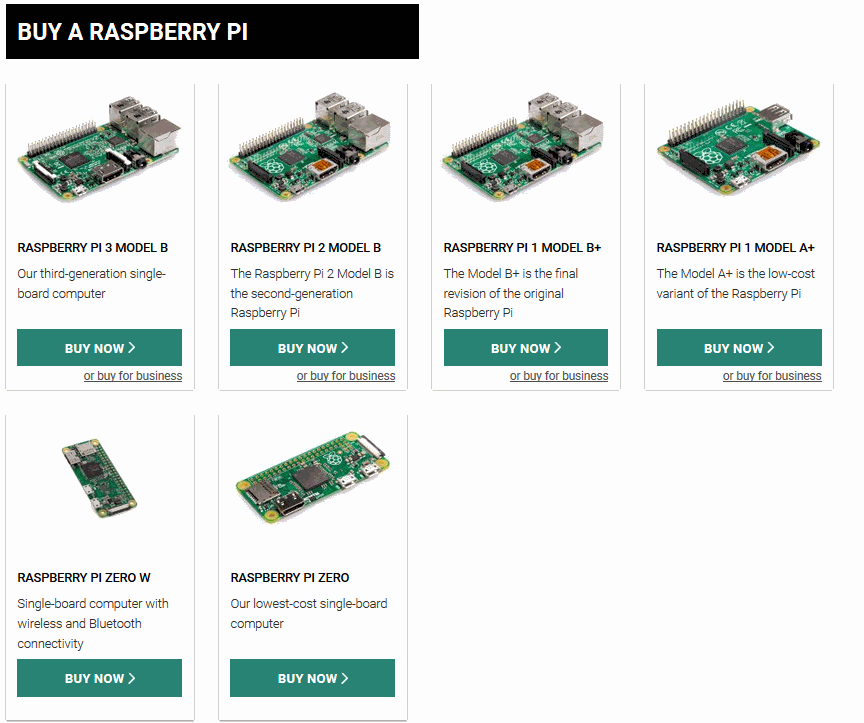
Where To Buy A Pi
I purchased my Model 2 B a long time ago from Element14. So long ago the stereo output is already oxidized now :(.
You can go to the Raspberry website To find your local stockists. Click this link, and select the Raspberry product to purchase. The site will use your location to find a list of vendors to buy from.
Before You Start
Raspberry Pi is a mini computer.
For the installation stage you'd need to connect your Pi to a wired Internet connection. Additionally, other things you'd need for a basic but practical Home Assistant setup are:
- Good quality power supply. I'm an audiophile after all - power supply matters. It's recommended that you use a good quality unit to power your Pi. Avoid phone chargers if you can because they do not always work well. Having said that, I'm powering my Pi off my router.
- Pi case. Raspberry Pi is a bare-bones computer (i.e. it's exposed and not protected from anything). Buying a case to protect the guts is never a bad idea. You'd avoid silly mistakes like short circuiting, snapping the GPIO pins, etc.
- micro-sd card. I am using a 16 GB for this but I recommend you go for at least 32 GB if possible. You'd also need a micro-sd card reader for installation.
- XiaoMi gadgets. Home Automation is kind of pointless without smart gadgets. Examples would be the XiaoMi Gateway, YeeLights, power socket, wireless switch, motion sensor, door sensor, XiaoMi Robot Vacuum, etc.
- Computer. You'd need to use your main computer to download the OS image, and then write the contents to a micro-sd card (in step 3).
If you're in Australia, checkout ozbargain.com regularly and wait for special offers on Pi and all the XiaoMi gadgets. You'd need a good collection of smart gadgets to make Home Automation fun. The costs of buying smart gadgets do add up so the dollar saved from OzBargain can be used to buy more smart gadgets. The OzBargain community will always find the cheapest prices for the day.
Just try and be patient and wait for deals. Once a good deal come up strike quickly. Some XiaoMi deals can expire in the span of minutes. Snooze and you will loose (I'm speaking from experience here!).
Hassbian

There are many ways to get Home Assistant running on Raspberry Pi. This tutorial will only focus on Hassbian. Leave a comment if you want me to write HOWTOs for these or other solutions. If there is enough interest, I'd see what can be done. The other solutions are:
They even have a video showing how easy it is to install Hassbian.
This tutorial is based on the Hassbian Installation page from Home Assistant's documentation. Go to the next start to begin preparation.
Preparation
In this step you download the latest Hassbian image from the Internet, write the contents of the downloaded image to a micro-sd card and then boot the Pi up with the micro-sd media.
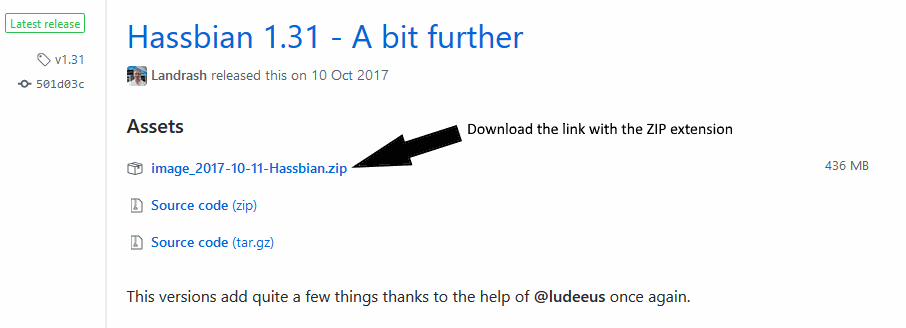
- Click this link: https://github.com/home-assistant/pi-gen/releases/latest. The link will always give you the latest version of Hassbian
- Download the ZIP file, in this example, it's image_2017-10-11-Hassbian.zip (Note this file name is for v1.3.1. Future releases will have a different file name):
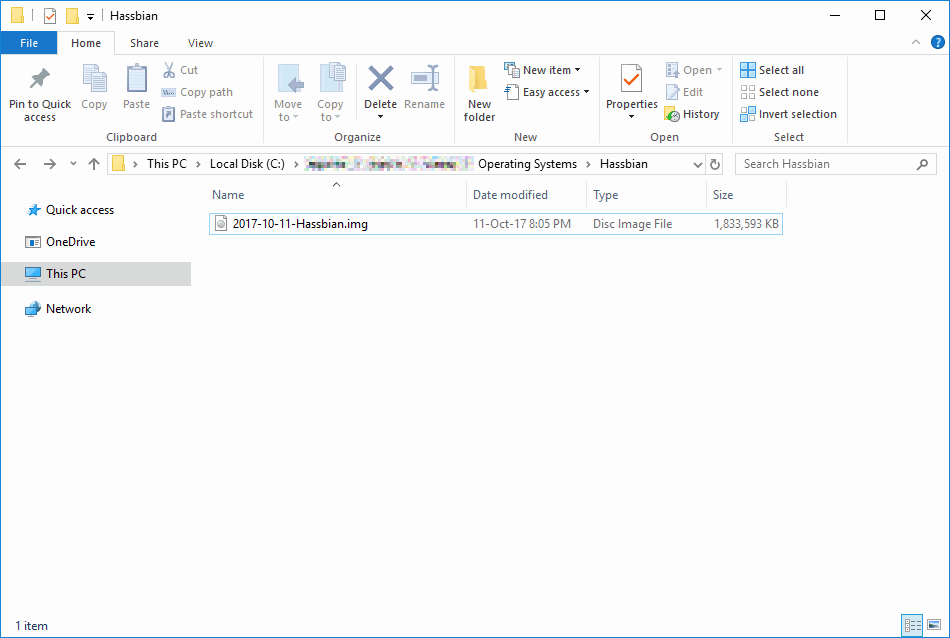
- Decompress the file you've downloaded using your favourite decompressor (Explorer, WinZip, WinRAR, etc) to get the IMG file:
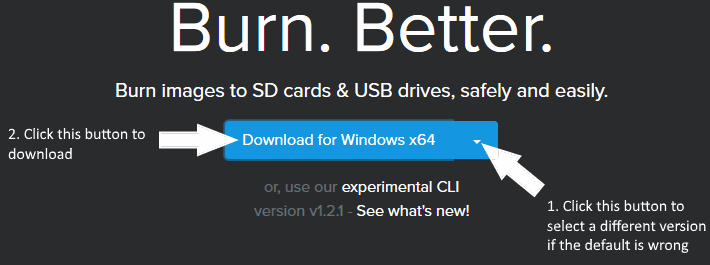
- Download Etcher: Click link (Select the correct platform for your computer).
- Install Etcher by double clicking the file downloaded from step 4. If prompted with a Security Warning, click the 'Run' button.
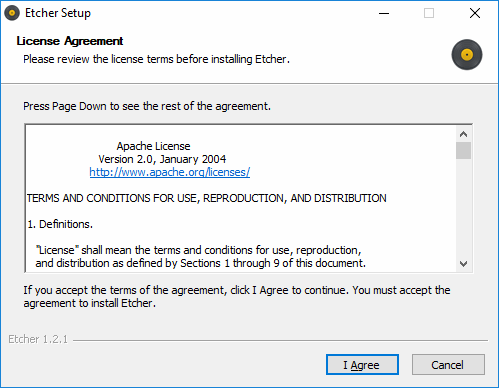
- Click 'I Agree':
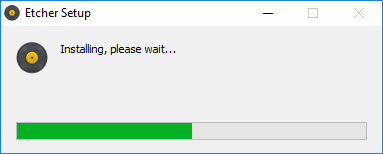
- Wait for installation to finish:
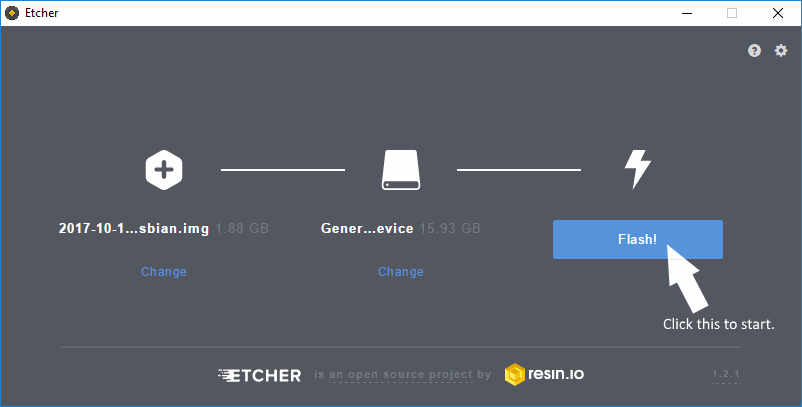
- Etcher should start automatically, click the 'Select Image' button:
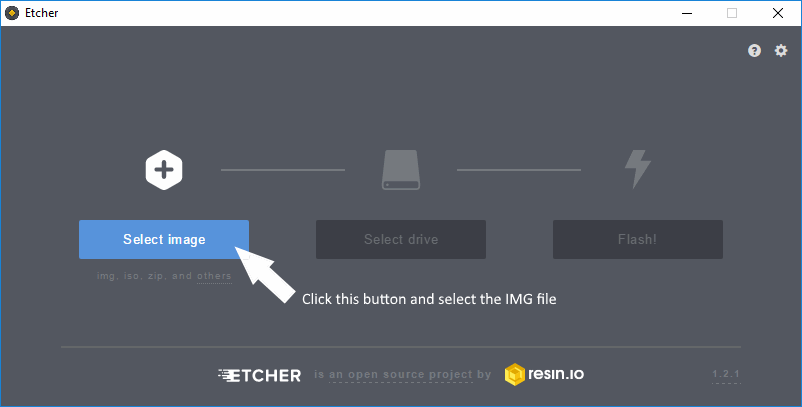
- A File selection dialog will appear. Select the IMG file you have extracted in step 3.

- Now insert the micro-sd into a card reader and connect it to the PC. Your Operating System may pop up warnings telling you it needs to format (or mount) the micro-sd card. Just cancel all of them.
- The middile picture should be updated automatically (I'm using a 16 GB card). Now click the 'Flash' button:
- If Windows popped up a 'Windows Access Control' dialog. Click 'Yes'. The third picture should be saying 'flashing', like so:
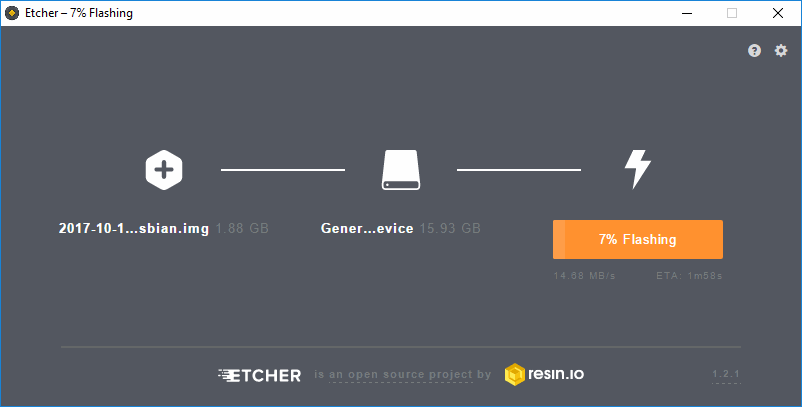
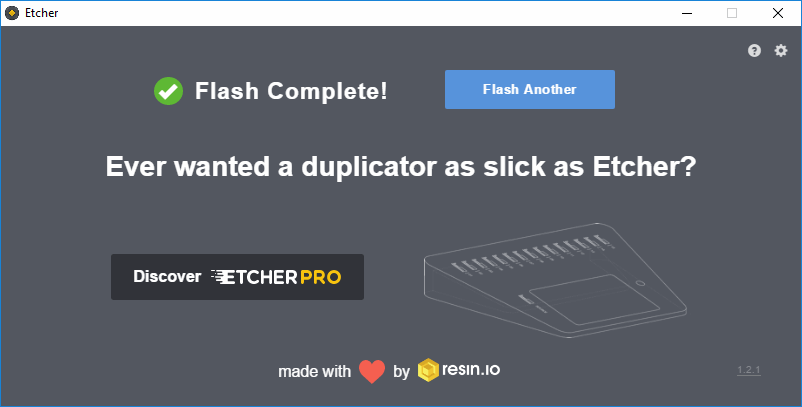
- After flashing, Etcher will verify for any errors. Wait patiently for everything to finish.
- Your micro-sd card is now ready for your Raspberry Pi
Install Hassbian
It is time to install Hassbian (and Home Assistant). You can connect a monitor and keyboard to your Pi if you like. The advantage of doing this is it can help in troubleshooting.
In my home network, IPv6 appears to cause issues. I'm not entirely sure if it's because my Network switch, or the fact that I'm using a Raspberry Pi 2 Model B.But if you have problems in Step 5, try disable IPv6 in your home router (or DHCP server), and try again.
- Remove the micro-sd card from your computer and insert it into your Raspberry Pi
- Connect a wired Ethernet cable from your Access Point to your Pi (Keyboard and monitor optional)
- Power on the Pi
- Wait for Hassbian to download and install the latest version of Home Assistant. This installation is happening in the background. No installation information will display on the connected monitor.
- Be prepared to wait if you have a slow Internet connection. (I'm on ADSL with a 3.5 Mbps download. It took about 15 to 20 minutes for Home Assistant to install and then start!!!)
-
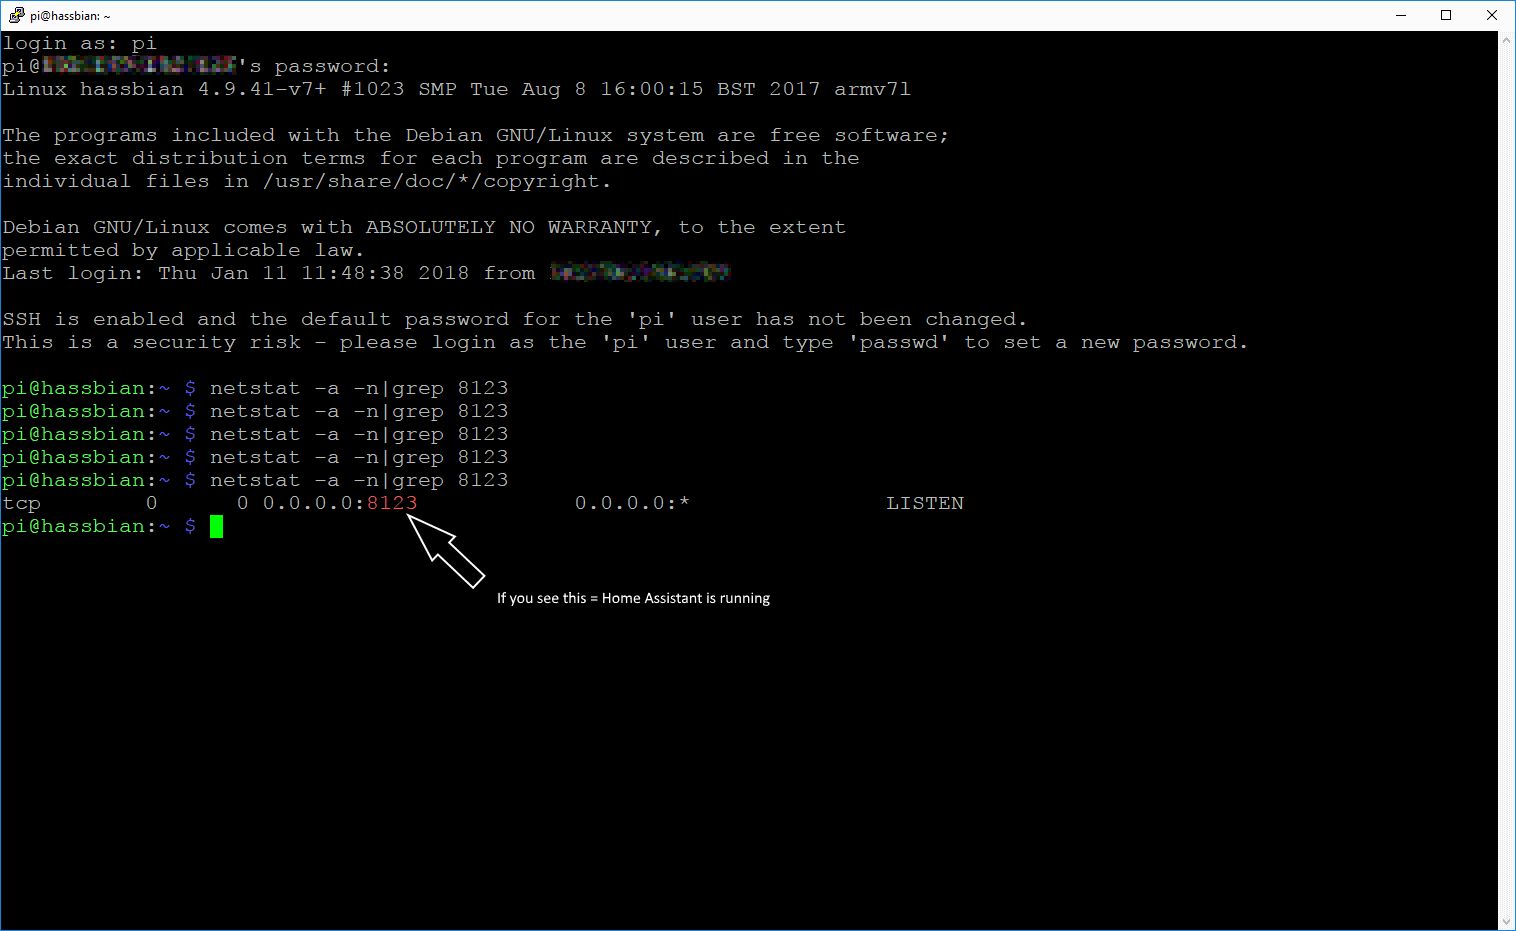
While the installation is progressing, you can SSH into your Pi and monitor the status of Home Assistant (For instructions on how to SSH, refer to the next page). Run the following command:
netstat -an|grep 8123
- The above command checks if Home Assistant is running and actively LISTENING for connections at port 8123. If you see this, then it means Home Assistant is now installed and running.
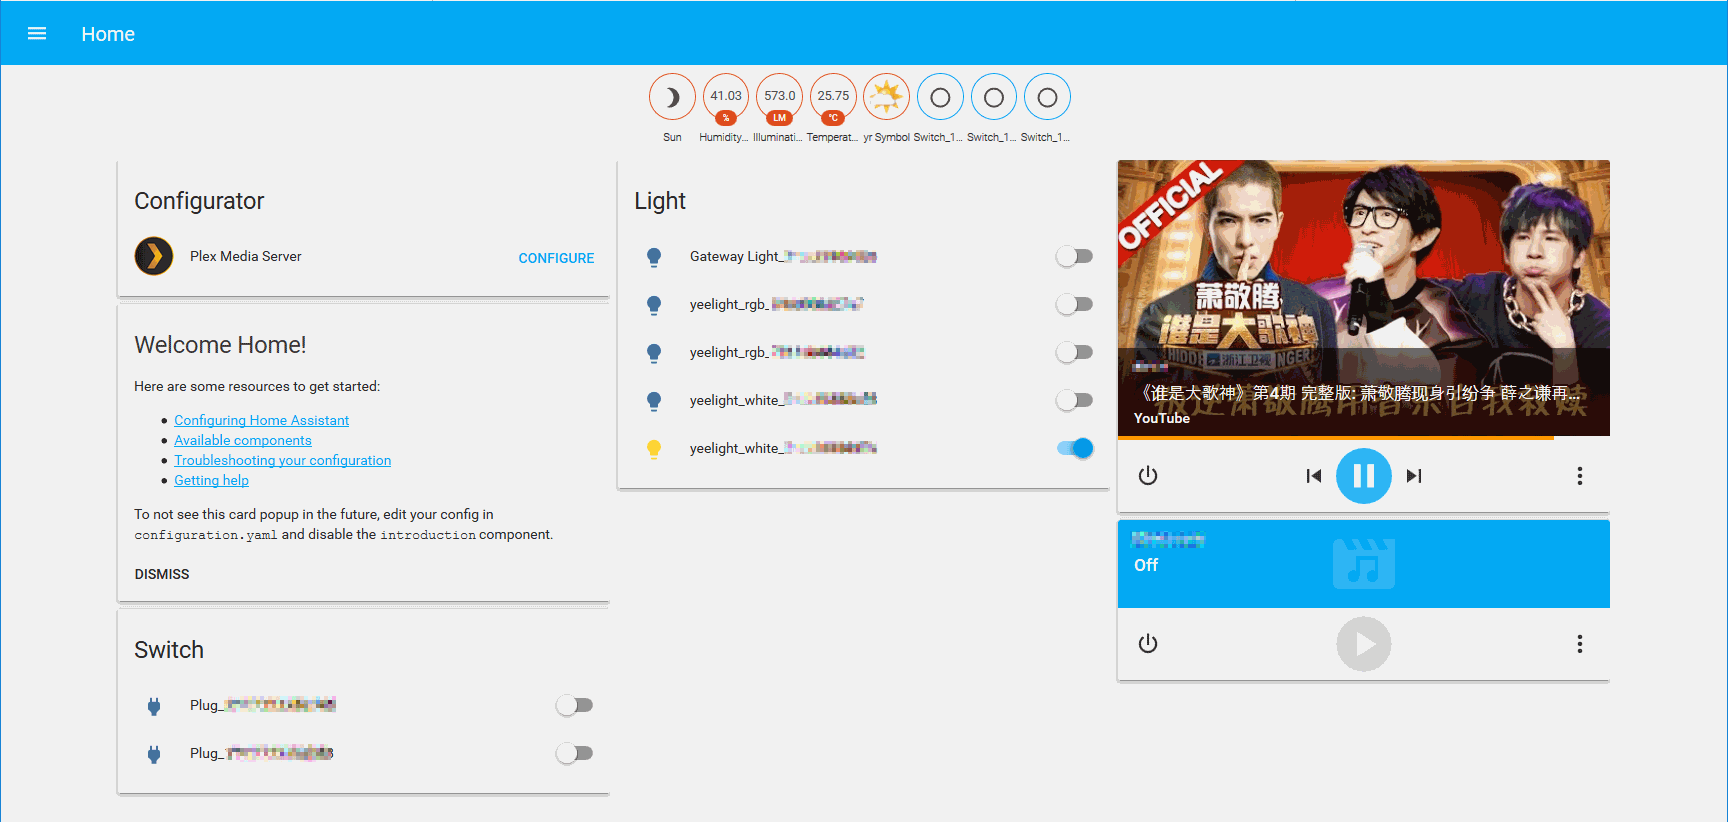
- Now from your computer, fire up the browser and goto http://hassbian.local:8123 (Or click this link). You should see this:

- Home Assistant can auto-discover devices. After a few seconds, you'd find extra devices showing up in Home Assistant.
Troubleshooting
- If you get nothing in steps 7 and 8 above. Please disable IPv6 on your Router (or DHCP server). Reboot the Pi and try again.
- The zeroconf name (hassbian.local) doesn't always work. If you have problem auto-discovering the Pi, go to your Router (or DHCP Server's) configuration page and look for the IP address of your Pi. Your Pi should have a hostname of 'hassbian'.
That's it. You now have a working Home Assistant running in your home network. A couple more steps to complete before we conclude this HOW-TO.
SSH Into Your Pi
The default account to your Hassbian installation is as follows (Linux is case sensitive, the username and password are all lowercase).
| Username | Password |
|---|---|
| pi | raspberry |
You need secure shell (SSH) client. A good freeware ssh client is putty. For Android devices, the JuiceSSH app works great. Here we are showing an example of a SSH using Putty
- Start Putty, enter 'hassbian.local' in the Host Name field (marked with an arrow):
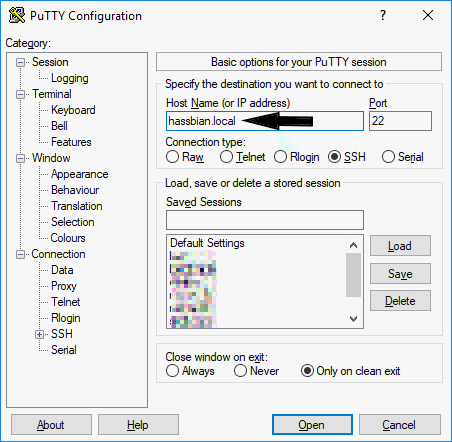
- Click the 'Open' button at the bottom of the window.
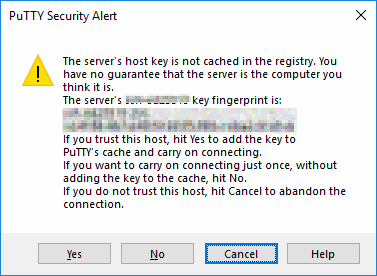
- On first connection, Putty will prompt a security alert. Click 'Yes' to accept:
- When you see the words 'Login As', enter 'pi' (no quotes) and press the ENTER key. Like so:

- When prompted for the password, enter 'raspberry' (no quotes) and press the ENTER key. The console will not display any characters as you type your password. You have to enter the password blind.
- Once you press the ENTER key, you should see a command prompt, like so:
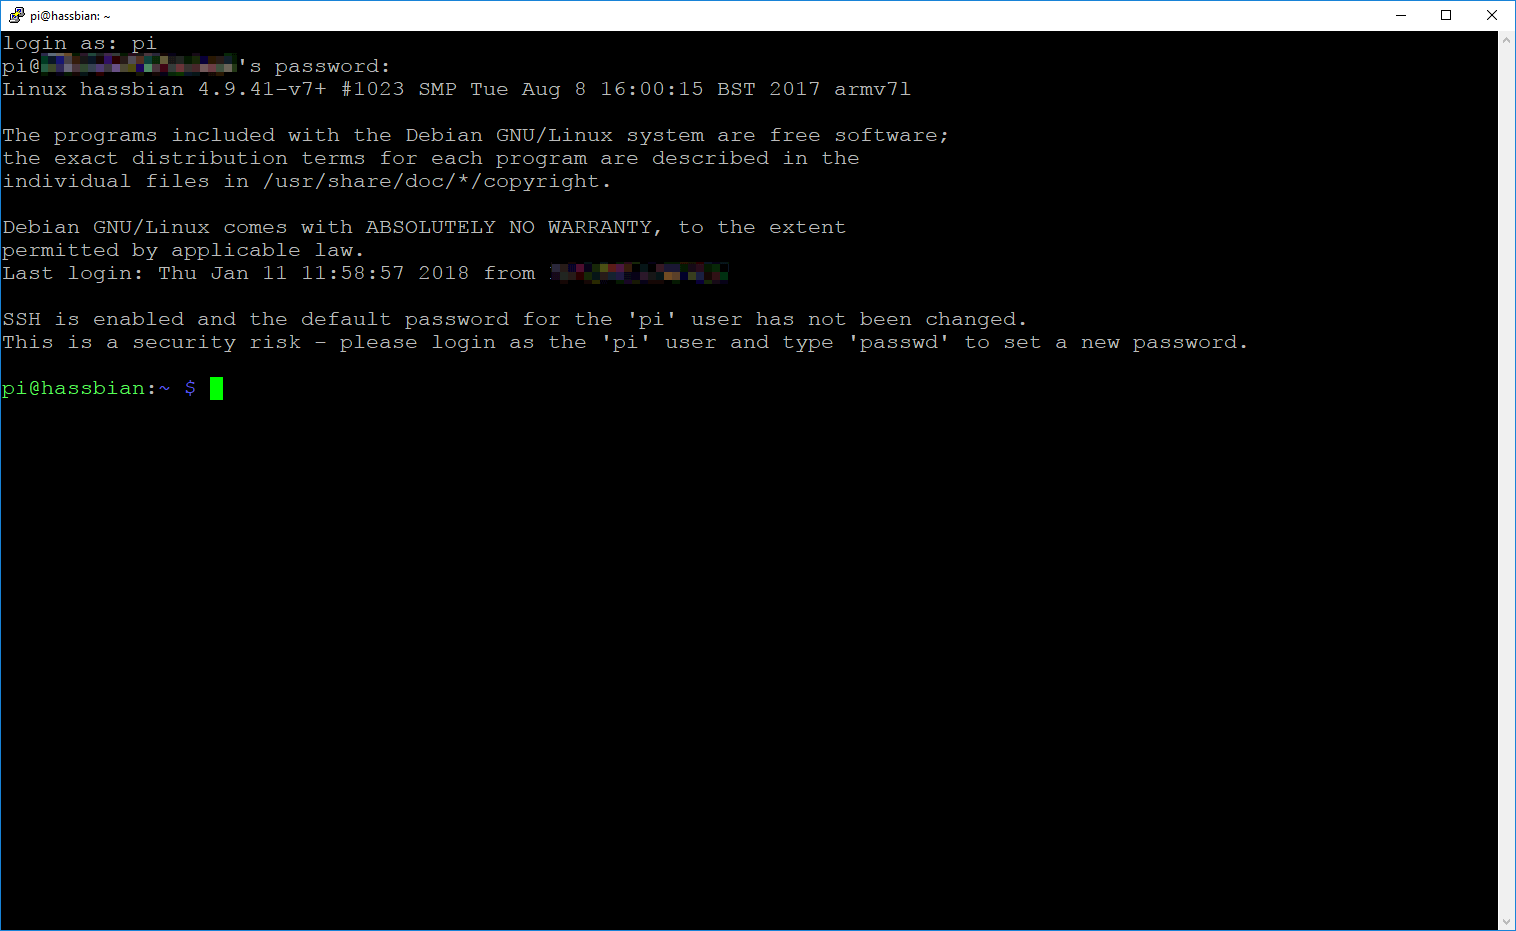
Notice the message after you logged in for the first time? The default password is publicly known and is a security risk.
SSH is enabled and the default password for the 'pi' user has not been changed.
This is a security risk - please login as the 'pi' user and type 'passwd' to set a new password.
Go to the next page to find out how to change the password
Change The Default Password
For better security, you must change the password for the user 'pi'. Choose a sensible password, but not too complicated else you'd risk forgetting it.
- Connect to your Pi via SSH if you havn't done so already (refer to page 7)
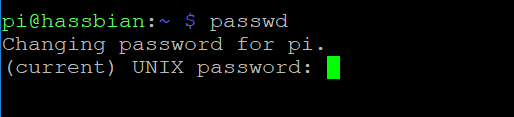
- Run the command passwd.
- Enter the default password 'raspberry'. There is no feedback so again you have to enter your password blind.
- You'd be prompted to enter a new password.
- Type in your new password now and press ENTER.
- Re-enter your new password as a verification.
- If successful you'd see the message 'passwd: password updated successfully'. Like so:
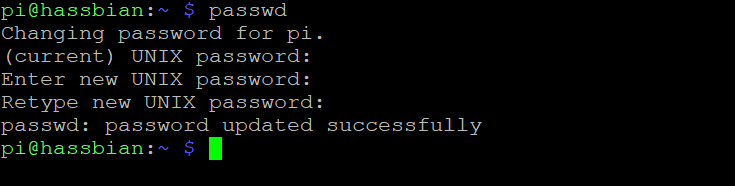
- Remember this new password. You have to use this new password for the username 'pi' every time you want to SSH to your Pi from now.
One more thing...
Home Assistant Configuration
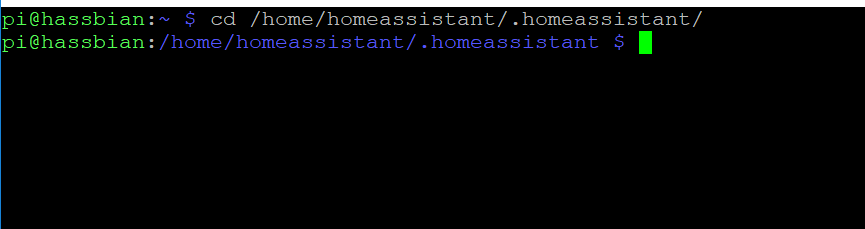
The Home Assistant configuration is located at /home/homeassistant/.homeassistant/. You'd need to modify some files in here to get Home Assistant running. I'd skip the boring details on how Linux security works and just touch on how to modify the files. TL;DR sudo.
- Connect to your Pi via SSH if you havn't done so already (refer to page 7)
-
Change your current working directory to the Home Assistant configuration folder by running the following command:
cd /home/homeassistant/.homeassistant
- If everything works, you should see the prompt changed from ~ to something much longer:
-
This folder contains some yaml files. To list the files in this folder, run the command
ls
-
Here's a listing of the configuration files.

- You'd need to modify some of these files (esp configuration.yaml).
Modifying a file
nano is a good editor for the first user. This section will describe how to use nano to modify a file.
-
To edit the a file, type nano followed by the file you want to modify, e.g. if I want to modify configuration.yaml:
sudo nano configuration.yml
- You should see this screen:
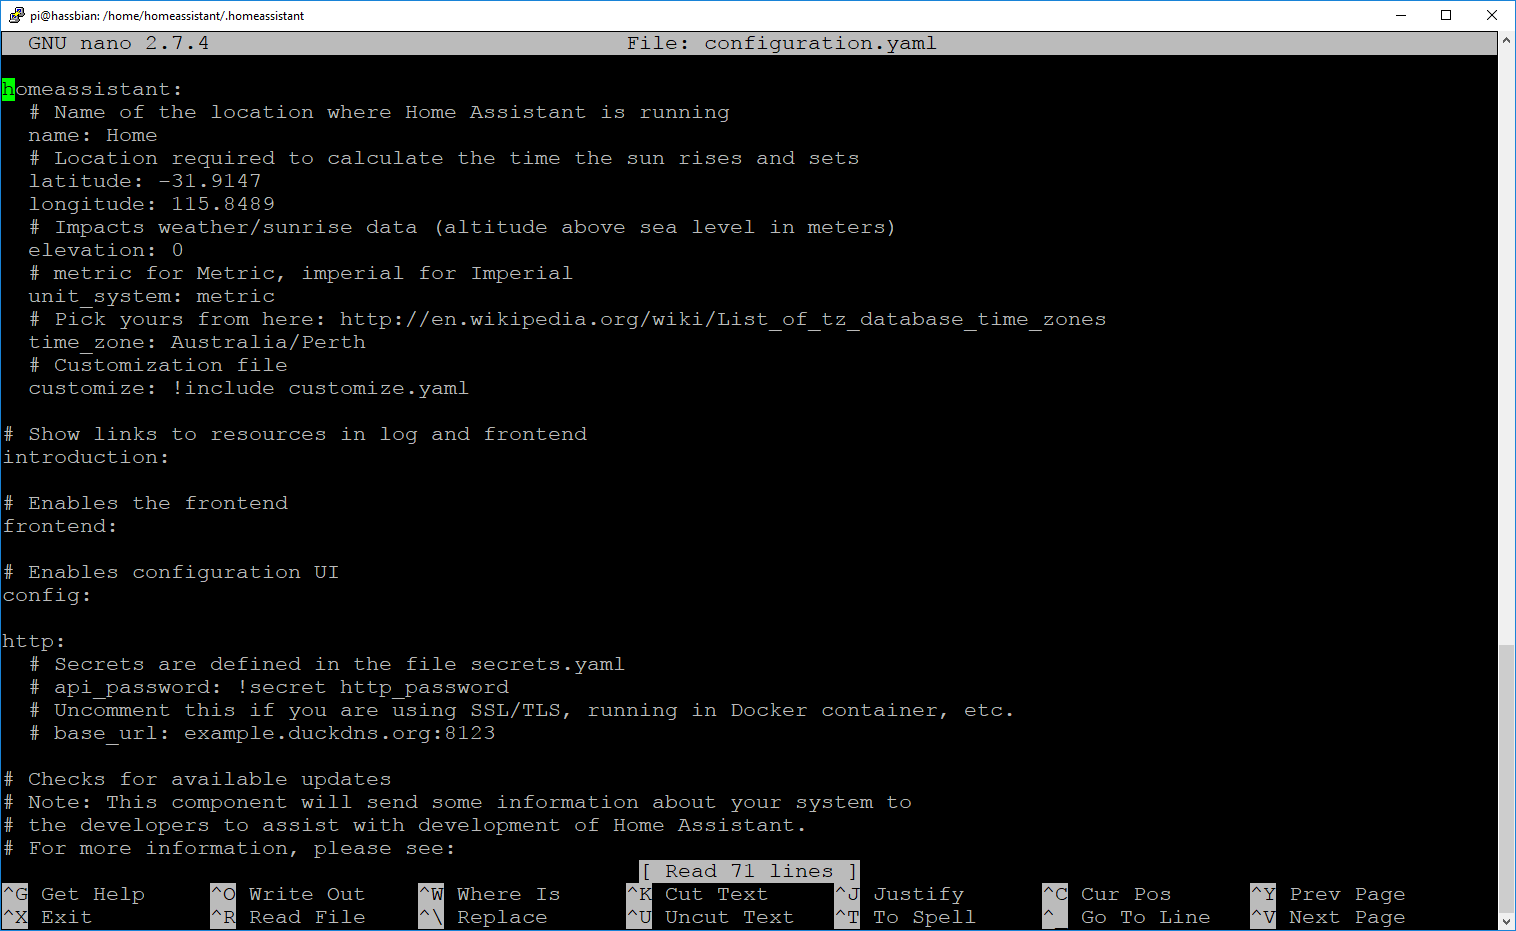
- You are now in the nano editor. The behaviour is like any word processor, but cruder. You can use the arrow keys, PgUp and Pg down to move the cursor to the position you want. And then just make the changes.
- To save the file, press CTRL and X together (CTRL+X). Press 'Y' to save and quit, 'N' to ignore changes and quit (useful if you have made too many mistakes and have no idea how to undo).

If you're confused with nano, google for some tutorials.
Conclusion
Well done if you have come this far!
Now that you have Home Assistant setup and all ready to go, it's time to add devices. Please read the XiaoMi Vacuum article first to setup basic security, NAT on your router, and IFTTT callbacks.
You can also check out the rest of the Home Automation articles to find out how to integrate other smart gadgets into your day to day routines.
Any questions/comments/suggestions please feel free to leave a comment below.
Related News

Linking Google Assistant To Home Assistant 0.80 and above
Every new Home Assistant release brings breaking changes.
Link Your Home Assistant To Google Assistant Home Control
Article removed as content is meant for older version of HASS and will no longer work in 0.8 and
Securing Your Home Assistant With LetsEncrypt SSL
In our previous Home Automation tutorials - our Home Assistant traffic traverses through the Inte
Comments
It is very interesting that…
It is very interesting that I cam use Pi to install Snakeoil. any special image required?
ARMv7 edition of Snakeoil is…
In reply to It is very interesting that… by Dmitry (not verified)
ARMv7 edition of Snakeoil is not ready yet. Hopefully I can find some time to implement that in the coming months.
Hi, Great article, I just…
Hi,
Great article, I just add one thing…you should tell to look for the permissions of the folders where the private keys are. I’ve got some issues when i tried to connect to HTTPs and was resolve by changing the permissions of home assistant user for that folders. Maybe because of the version of hass.io - 0.82.1
Cheers
Is the IMG file of Snakeoil…
Is the IMG file of Snakeoil ready for Raspberry Pi 3B installation? Is it as easy as volumio or Runeaudio for installation of the Snakeoil just by flashing it onto a micro SD card and inserting it to the Raspberry Pi so simple? Where is the location of all the OS installation files stored on the web? Can I have the relevant link here to search them out and have a trial?
Thanks
Yes, the IMG file works with…
In reply to Is the IMG file of Snakeoil… by clplarry (not verified)
Yes, the IMG file works with all versions of Raspberry Pis - mainly because it’s 32 bits.
All the Intel ISOs and IMGs are in one location, follow the "Version" link in this article to get the latest image to use.
Add new comment